Road-Bike Sizing
Road-bike sizing can be complicated and disastrous if you get it wrong. The guides offered by manufacturers often assume an aggressive cycling style and suggest frames that are too large. It is recommended to get a bike fitting before buying an expensive new bike.
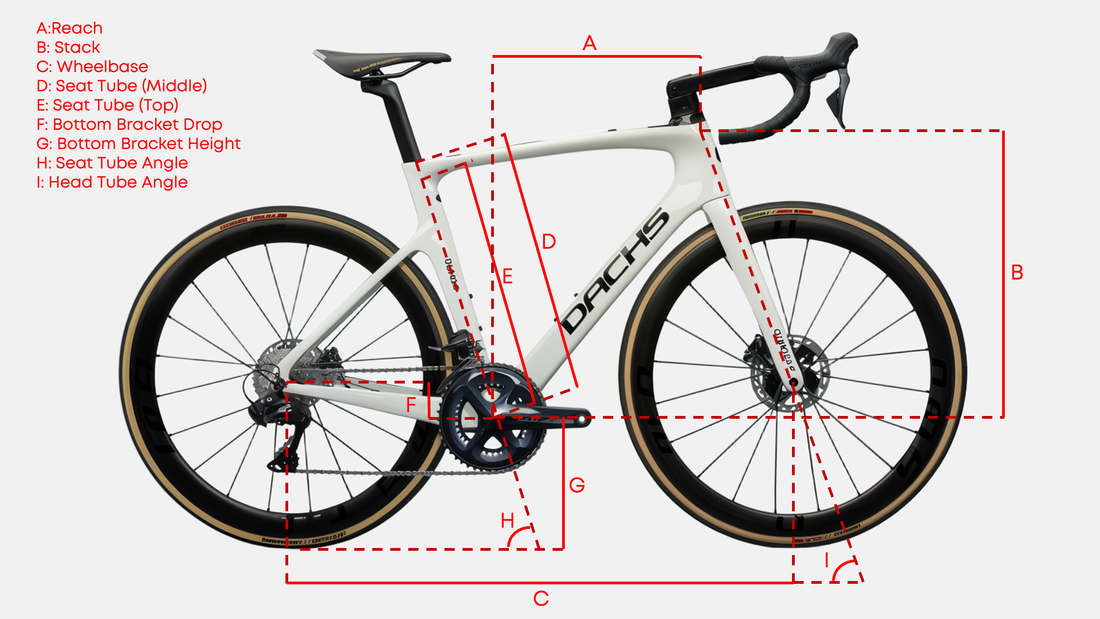
Note: The dimensions in the image are what we recommend to compare when looking at road-bike sizing.
a. Basics of Bike Sizing
Finding the correct frame size depends on a combination of body measurements, riding posture, and bike geometry. Sizes and geometry can vary greatly between frame styles and manufacturers, so having a basic prior understanding can be very beneficial.
Road-bike frames are traditionally measured by their seat tube length. This measurement is normally taken from the centre of the bottom bracket to the bottom of the top tube. However, this can differ by brand, with some measuring to the top of the top tube or even the centre of the top tube.
There are several issues with using seat tube length for sizing bikes. The first is that the position of the bottom bracket (and therefore crankset) is no longer standard, with higher-end bikes often having higher bottom brackets to enable pedalling through corners.
Secondly, bike geometry varies significantly nowadays. Bikes often have longer top tube lengths (and therefore reach) for lower, more aggressive styles. Reach is more difficult to adjust than height. You can raise your seat or lower handlebars, but you cannot easily shorten your reach without putting your seat in an inefficient position or changing handlebars.
Although there are many calculations online explaining how to select a road-bike frame size using your inseam length (e.g., ×0.665 or -12 cm), there is no longer a single magic formula.
The best method is to test the bike before buying. Stand over the bike and ensure you have at least 2–4 cm clearance, then sit and make sure the reach is appropriate for you and your cycling style.
Practical Tip: When selecting a road bike, have someone take photos or videos of you in a side-view position on different bikes. Compare your body posture across different bikes, with your hands in both dropped and higher positions.
Important: Don’t feel strange or embarrassed to go down a frame size, especially if your bike is 1 or 2 sizes smaller than your clothing size. This is normal. The cycling industry is designed around 60 kg riders who maintain an aerodynamic position and output 300 watts for hours. They look skinny, so we assume normal people need larger bikes—but this is not the case. We need smaller bikes because our backs are not trained for longer reaches.
b. General Frame Size Chart
Not to be used to size your bike!
This is included as an example of what to expect from bike manufacturers and should be used to understand variations.
| Cyclist Height | Inseam Length | Frame Size | Top Tube | Label Size |
| 147–157 cm | 63–69 cm | 47–50 cm | 47–50 cm | XXS–XS |
| 157–168 cm | 69–76 cm | 50–54 cm | 50–53 cm | XS–S |
| 168–178 cm | 76–84 cm | 54–56 cm | 53–55 cm | M |
| 178–188 cm | 84–89 cm | 56–60 cm | 55–57 cm | L–XL |
| 188–196 cm | 89–94 cm | 60–63 cm | 57–60 cm | XL–XXL |
c. Tips for Bike Sizing
1. Shorter Riders (Under 162 cm)
- Look for bikes with smaller wheels (650c) or compact frame geometry.
- Pay attention to standover height to ensure safe clearance.
- Use shorter crank arms (160–165 mm) to maintain proper knee angles.
2. Tall Riders (Over 188 cm)
- Opt for larger frame sizes (60+ cm) with a longer top tube for adequate reach.
- Consider wider handlebars for better control.
- Use longer crank arms (175–180 mm) for efficient power transfer.
3. Cyclists with Long Legs (Proportionally Longer Inseam)
- Prioritise standover height and saddle adjustability over top tube length.
- May require a taller seat post or frames with more seat tube extension.
- Explore different crank arm lengths.
4. Cyclists with Long Torso (Proportionally Shorter Legs)
- Focus on longer top tube and shorter seat tube geometry.
- Use stems with longer reach to match torso length.
- Explore different crank arm lengths.
d. Sizing Tips for Cycling Styles

Comfort Style
Look for: Longer seat tube and shorter top tube to encourage an upright posture.
Practical Tip: If comfort is your priority, go for a smaller frame.
Endurance Style
Look for: Higher top tube for shorter reach, more hand options and more stability.
Practical Tip: Ensure your reach is comfortable with your hands in various positions, as having multiple cycling postures is important on long rides.
Aggressive Style
Look for: Long top tubes and lower handlebars for an aerodynamic position.
Practical Tip: Select an appropriate crank arm length (important for power transfer) before finalising your frame size (and seat tube length).
Climber Style
Look for: Shorter top tubes for a more upright position, although lightweight options are usually the main focus.
Practical Tip: Ensure you can sit upright with open lungs and maintain consistent power output.
Time-Trial Style
Look for: Something that fits your body; TT-bikes often have shorter seat tubes and longer top tubes for a flat body position.
Practical Tip: Be honest about your abilities and ensure accurate body measurements when selecting a frame size. Complete a bike fitting to maximise speed and performance.
Gravel Style
Look for: Shorter top tubes and flared handlebars for comfort and control, more tyre clearance for wide tyres and mud-guards.
Practical Tip: Gravel geometry is often suitable for beginners and intermediate riders, even on roads, and many upgrades are possible.
e. Handlebars & Saddle
When selecting the right road-bike frame size, we need to mention handlebars and saddles. These can have big effect on bike-fit, but are common upgrades. Therefore, there are discussed in detail in the Fitting a Road-Bike and Upgrading a Road-Bike Chapters. However, there are some important points to consider when sizing a road-bike.
Handlebar Width
- Should match the rider’s shoulder width for optimal control and comfort.
- Too narrow: Can cause restricted breathing, instability, and excessive pressure on wrists.
- Too wide: Leads to increased wind resistance and discomfort in shoulders and upper back.
- Affects overall aerodynamics and efficiency, particularly for endurance and racing positions.
Handlebar Drop Shape
- Determines hand placement and comfort when riding in the drops.
- Flat-bars: Limited number of hand-positions available, but some people just like them.
- Compact drops: Shorter reach and shallower drop—ideal for endurance riding and smaller riders.
- Traditional drops: Deeper position, better for aggressive and sprinting positions.
- Ergonomic drops: Flattened or contoured for increased comfort on long rides.
- Impacts wrist and hand position, influencing pressure distribution and control.
Handlebar Drop Height
- Refers to the vertical distance between the top of the bars and the lowest part of the drops.
- Lower drop height: Encourages a more aerodynamic position but may strain flexibility.
- Higher drop height: More comfortable for endurance riding, reducing stress on back and shoulders.
- Must be balanced with stem length and stack height to ensure a sustainable riding posture.
Saddle Width
- Should match the rider’s sit bone width for optimal support and pressure distribution.
- Too narrow: Can cause discomfort, numbness, and excessive pressure on soft tissues.
- Too wide: May lead to chafing and inefficient pedaling.
- A properly fitted saddle improves long-distance comfort and riding efficiency.
Saddle Height
- Determines pedaling efficiency, knee alignment, and overall comfort.
- Too high: Causes excessive leg extension, leading to hip rocking, knee strain, and power loss.
- Too low: Increases knee flexion, leading to anterior knee pain and reduced power output.
- Ideally, the knee should be slightly bent (~25-35° angle) when the pedal is at the lowest point.
Saddle Position (Fore-Aft & Tilt)
-
Fore-Aft position affects balance and power transfer.
- Too far forward: Increases pressure on the hands and knees.
- Too far backward: Reduces pedaling efficiency and can strain the lower back.
-
Saddle tilt influences comfort and weight distribution.
- Neutral or slight downward tilt is preferred for comfort and preventing numbness.
- Excessive downward tilt can cause sliding forward, increasing hand and wrist strain.
Choosing the right handlebar affects aerodynamics and ride comfort, particularly to the arms. Choosing the right saddle reduces pressure points and prevents discomfort over long rides. Since these components significantly impact fit and ride quality, they are among the most common upgrades for road cyclists.
Again, all these points are explored in more detail in future chapters.
f. Recap of Important Sizing Tips
1. Don’t blindly trust manufacturer recommendations:
Be honest about your goals and style, armed with some research.
2. Standover Height:
Ensure at least 2–4 cm of clearance between the top tube and your inseam.
3. Test Rides:
Always test ride a bike and get someone to take side-view photos to assess body posture before purchasing.
4. If in doubt, size down:
It’s easier to make a bike fit longer legs than to shorten reach.
5. Professional Fitting:
If you plan to invest in a bike, we highly recommend consulting a bike fitter to ensure you buy the right bike for your body.
Continue reading with Road-Bike Brakes